
You want to display your Twitter messages on your Django website and decide which tweet should be displayed? No problem, here you can find my solution.
My approach
I wanted to display my current tweets on the homepage of my website but also needed the possibility to choose which tweets should be displayed and which not. So I decided to save the tweets first in a simple MySQL table and then manage them in the backend.
The Tweet Table
First let's create a new table in the database, in my case it's a MySQL database. It's a very simple table with only a vew columns.
class Tweet(models.Model):
    tweet_id = models.CharField(max_length=250, null=True, blank=True)
    tweet_text = models.TextField()
    published_date = models.DateTimeField(blank=True, null=True)
    is_active = models.BooleanField(default=True)
    def __str__(self):
        return self.tweet_text
Get the Tweets using Tweepy
Tweepy is a very powerful Python library for accessing Twitter. To access the Twitter API with Tweepy you need a Consumer Key and a Consumer Secret as well as an OAuth Access Token and an OAuth Access Token Secret. To get these keys you need to register a Twitter app first. How to do this is described in the following article: How to Register a Twitter App in 8 Easy Steps
Let's get the tweets from the user timeline and save them in the database table. Therfore we use a simple Python script "twitter.py":
import tweepy
from tweepy.auth import OAuthHandler
from .models import Tweet


def user_tweets():
    auth = OAuthHandler('Consumer Key', 'Consumer Secret')
    auth.set_access_token('OAuth Access Token', 'OAuth Access Token Secret')
    api = tweepy.API(auth)
    user_tweets = api.user_timeline(count=50)
    return user_tweets

def save_to_db():
    original_tweets = user_tweets()
    for original_tweet in original_tweets:
        if not original_tweet.retweeted:
            if not Tweet.objects.filter(tweet_id=original_tweet.id):
                new_tweet = Tweet(tweet_id = original_tweet.id, tweet_text = original_tweet.text, published_date = original_tweet.created_at, is_active = True)
                new_tweet.save()
Manage the Tweets
As already described, we want to control which timeline tweets are displayed on the website. For this purpose, we display the stored tweets in a list and give the option of marking them as "inactive". To do this, we first extend the views.py.
@login_required
def tweet_list(request):
tweets = Tweet.objects.order_by('-published_date')
page = request.GET.get('page', 1)
paginator = Paginator(tweets, 10)
try:
tweets = paginator.page(page)
except PageNotAnInteger:
tweets = paginator.page(1)
except EmptyPage:
tweets = paginator.page(paginator.num_pages)
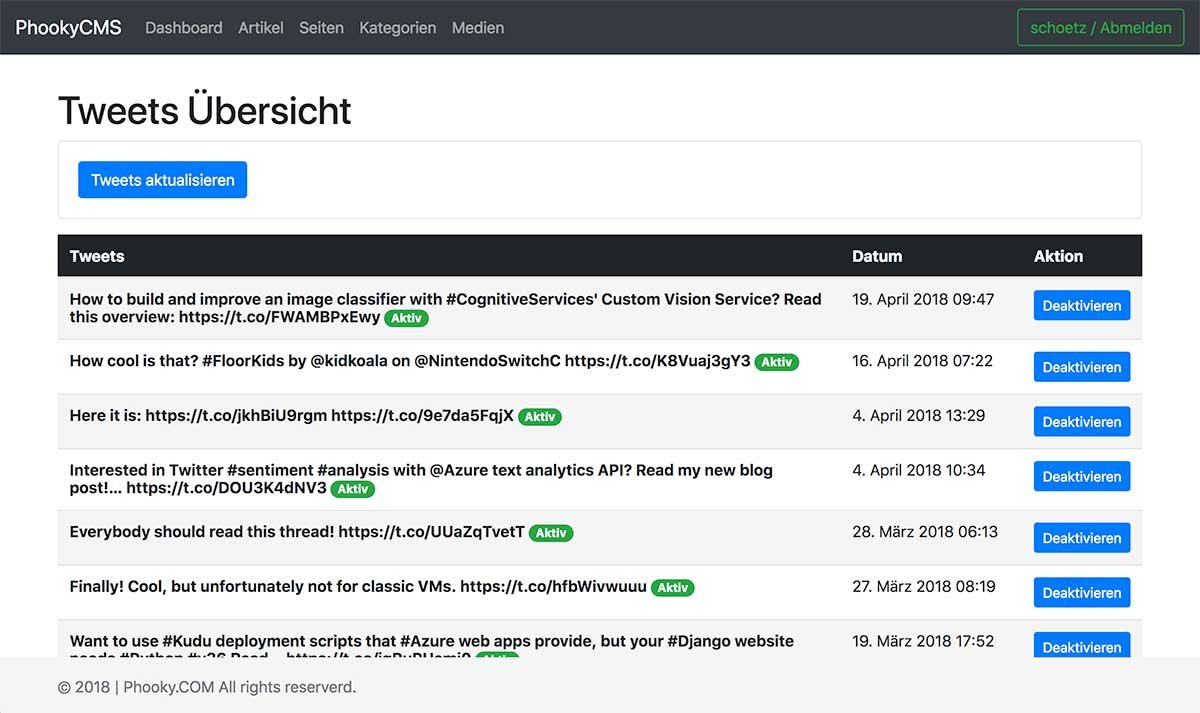
return render(request, 'cms/tweet_list.html', {'tweets': tweets})The Django template "tweet_list.html" for our list looks like this:
{% for tweet in tweets %}
    <tr>
      <th scope="row">{{ tweet.tweet_text }} {% if tweet.is_active %}<span class="badge badge-pill badge-success">Aktiv</span>{% endif %}</th>
      <td style="white-space:nowrap;">{{ tweet.published_date }}</td>
      <td>{% if tweet.is_active %}
        <a class="btn btn-primary btn-sm" href="{% url 'tweet_set_inactive' pk=tweet.tweet_id %}" role="button">Deaktivieren</a>
        {% else %}
        <a class="btn btn-success btn-sm" href="{% url 'tweet_set_active' pk=tweet.tweet_id %}" role="button">Aktivieren</a>
        {% endif %}
        </td>
    </tr>
    {% endfor %}
Dont't forget to add the corresponding url patterns for all views in the urls.py. To be able to manage the tweets in the list we extend the twitter.py by two functions.
def set_inactive(pk):
    Tweet.objects.filter(tweet_id = pk).update(is_active = False)

def set_active(pk):
    Tweet.objects.filter(tweet_id = pk).update(is_active = True)
And also the views.py:
@login_required
def tweet_set_inactive(request, pk):
    set_inactive(pk)
    return redirect('tweet_list')

@login_required
def tweet_set_active(request, pk):
    set_active(pk)
    return redirect('tweet_list')
To get the tweets on demand (with a click on a button) we extend the views.py again.
@login_required
def tweet_fetch(request):
    save_to_db()
    return redirect('tweet_list')
The Twitter list looks like this:
With your tweets in the MySQL table it's pretty easy to display them on your website. Of course you can get and save much more information from the Twitter API. In my case, however, this was sufficient.
The Challenge: Mysql & Emojis
If you want to store Emojis in a MySQL table you normally will run in this error:
Incorrect string value: '\x01\x9D\x8C\x86' for column 'column_name' at row 1You’ll need to make sure your columns of table are utf8mb4 encoded. A good way in Django is to generate an empty migration and fire some SQL commands on it.
./manage.py makemigrations --empty --name convert_to_utf8mb4 DJANGO_APPIn the empty migration file fill in the following migrations.RunSQL operation:
class Migration(migrations.Migration):

    dependencies = [
        ('DJANGO_APP', '0017_convert_to_utf8mb4'),
    ]

    operations = [
        migrations.RunSQL(
            sql=['ALTER TABLE cms_tweet MODIFY tweet_text VARCHAR(255) CHARSET utf8mb4 COLLATE utf8mb4_unicode_ci'],
            reverse_sql=['ALTER TABLE cms_tweet MODIFY tweet_text VARCHAR(255)']
            )
    ]
Now, you can store also tweets with emojis without getting errors. (If you are using django-admin, you'll also need to patch django_admin_log table. In my case this wasn't necessary)
Cover image by FirmBee | twitter-social-media-media-social-793050 | CC0 License